by Collin Hussey
For those concerned about the Eureka Garratt’s pulling ability, especially for the front water tank, I decided to remove the tank from the chassis to access what space is available for more weight.
It seems that everyone you hear, says there’s not enough room for more weight, I thought that it might need to be applied in different spots on the outside. However, on examination, I believe there is enough space on the inside to add enough lead weight to be more than adequate.
To take the tank off, there are 3 Phillips head screws to be removed, I found them a tight fit, that care was needed on one, so make sure you use one of the larger watchmaker ones, otherwise, I found a tendency that it did not bite, started to sheer the edges off the screw head. If you can get them, there is a good set of 6 Stanley screwdrivers that sit in the hand that have an end the sits hard in the palm with the rest rotating, the largest one was perfect.
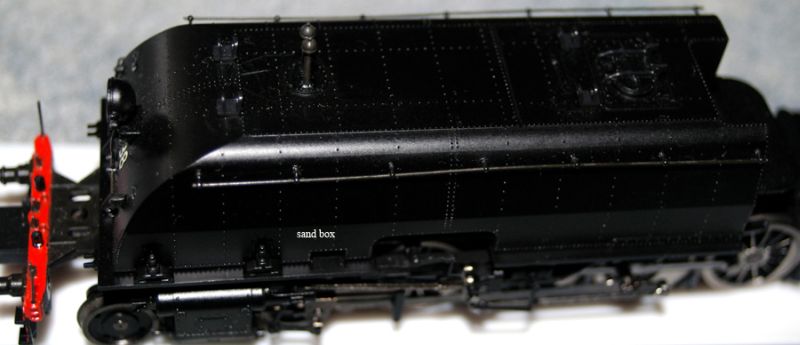
When taking the tank off there is 2 thin black leads to the headlight, on the drivers side an orange and red one, on the fireman’s side there are white leads, the red&white ones will need to push in when re-assembled. Also alignment of the tank at the sand box point where it clicks in with a gentle squeeze, photo 3533
When the tank is removed the wires to the LED are connected so care to not pull out. These are clearly seen in the image above.
What you will find is that there are 2 metal weights at each end of the tank unit. As you can see in the photo below these weights are wider than the motor assembly, but fit within the tank shell with a reasonable amount of space between the edges and the inside of the tank walls.
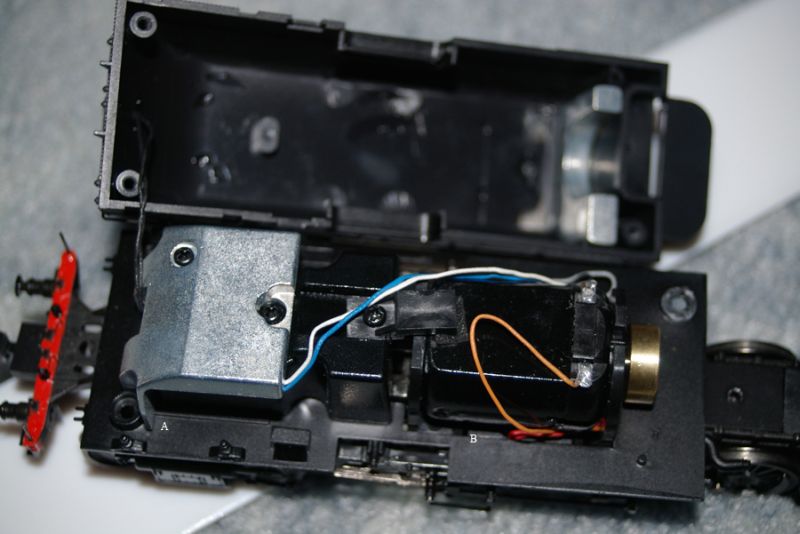
By staying within the dimensions of the weights themselves it is possible to add pieces weight in the end marked, in the photo below. An 18 x 9 x 5mm on both sides and at B the same width and height, but the thickness only about 3mm. It is easy to see the inside lip on the tank, from where the reversing link goes (recessed bit mid way along the tank) and this allows the width about 3mm for lead to be set at those two locations,

I am sure that by adding lead of those sizes would dramatically improve them, well above what they pull now.
I have not looked in the tender end yet, but as I progress on from the front end with weathering etc, it will be reached eventually.
Having put a reasonable amount of weight in the front tank I decided on trying the main bunke end. This I found to be quite interesting to say the least. With the extra size I thought that there was plenty of space for extra weight in there, how wrong I was.
It seems that the whole top of the tender, from the motor to the inside of the coal, and into the main chute area has a solid block of weight. The only spot I could find to add any, was in the recess that sits at the front of the motor, (the same as in the front tank). However, even here I was unable to fit the same amount of lead, for 2 reasons.
1] There is a raised piece of plastic moulding that prevents weight being inserted.
2] The tender is actually narrower than the water tank, thus allowing for less actual room being available.
As a result, the amount of extra lead weight that was able to be fitted in that area was less than half that of the front tank.
At the other end near the magnets, there is no room for any weight.
The only option then for the coal bunker is to somehow add it above the coal, or along the insides of the coal bunker, and then covering it with loose coal.
Overall, it is possible to add extra weight, without too much trouble, with what I have put in the tank it certainly has made it worthwhile, although I don’t think that the little that can be put inside the main tender will make a lot of difference. It then comes down to the keeper plate and the mod that Josh did. This adds up to the best option, although I personally would like to see a solid piece of moulded metal to do a replacement of the plastic keeper plate.
Even if a plate could used to replace have of the plastic piece.
For those modelling the different era’s grades etc, the load for the Garratts, are as follows, in tons
| Light | Heavy | |
| Sydney – Hornsby | 575 | 610 |
| Horsby – Broadmeadow | 610 | 650 |
| Broadmeadow – Hawkesbury | 985 | 1108 |
| Hawkesbury River – Cowan Light | 575 | 610 |
| Enfield – Goulburn | 900 | 900 |
| Goulburn – Junee | TBA | TBA |
| Lithgow – Georges Plains Light | 850 | 900 |
| Georges Plains Light – Mlge 161.45 | 560 | 600 |
| Mlge 161.45 – Orange | 850 | 900 |
The above loads show what they were allowed, especially on the 1:40 & 1:75 grades.
The loads shown for Enfield to Hornsby are the same for Orange to Nasdale & Molong to Orange.
Whilst they did not run that much to Lithgow, the loads were 360 valley to Katoomba, less than the 57 & 58s.
Normally realising these loads a general wheat train on a 1:40 would be 9 BWH + Van for heavy Garratt